


The drag and drop api enables applications to use the drag and drop feature natively in the browser, making it easy for developers to create interactive experience for users.
Draggable and Droppable Elements
For drag and drop features to work in our apps, we need to define which html tag is draggable and which is droppable. Draggable elements are elements or html tags that can be dragged with the mouse while droppable elements are elements that we can drop other elements on. That means we can drop draggable elements on droppable elements.
We have default draggable and droppable elements. But we can also make an element that is not draggable by default draggable by setting the draggable attribute of an html tag to true. Some elements draggable by default include image tag(img), anchor tag(a), as well as texts.
Possible Events that can be fired on draggable and droppable elements
For draggable elements, some include:
- dragstart -> This event fires when you start moving a draggable element with the mouse
- drag -> This event fires when the draggable element is being dragged
- dragend -> This event fires when we stop dragging the element. It is the last event in the drag and drop operation.
Droppable elements events include:
- dragenter -> This is fired when a dragged element first enters the droppable element area as it is being dragged.
- dragleave -> This event is triggered when a draggable element leaves the droppable element area
- dragover -> This event is fired when a draggable element is over a droppable element area as it is being dragged.
- drop -> This event is triggered when a draggable element is dropped on a droppable element area.
Code walkthrough demonstrating Drag and Drop
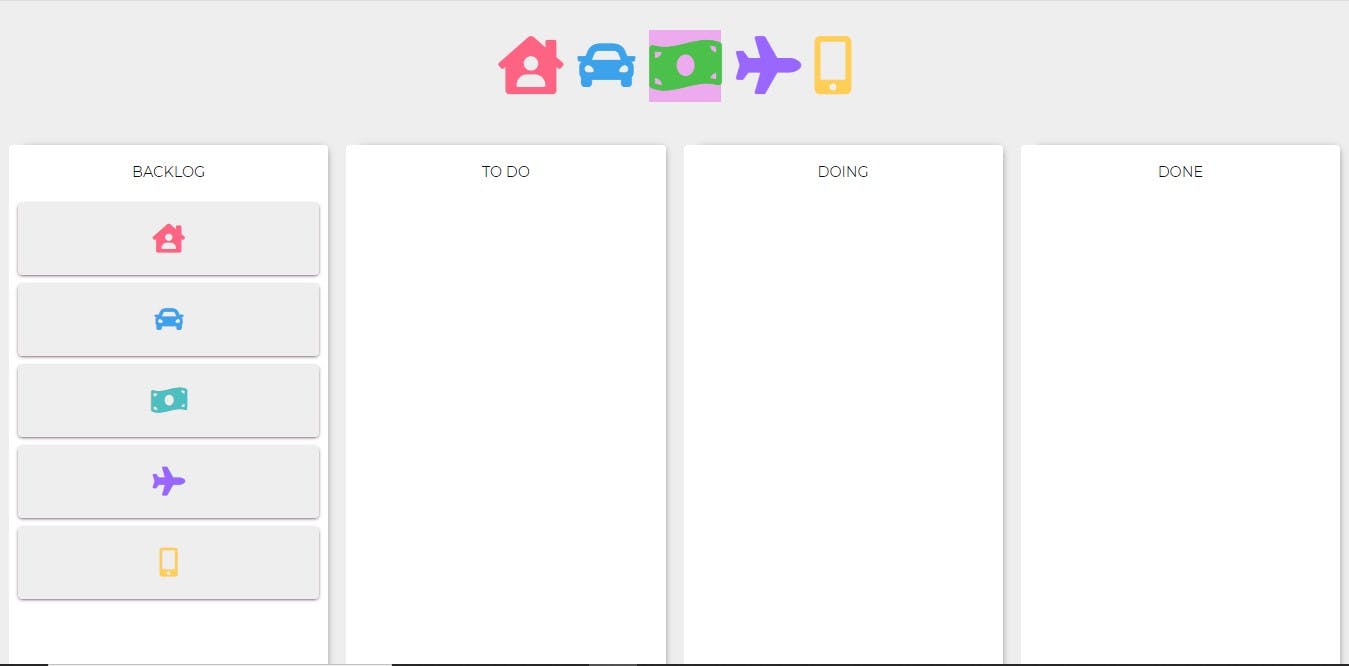
Suppose we want to create the app in the image above, where we can drag on of the cards in the 'backlog' column to any other column. The image above is a kanban board and drag-and-drop is one of its key functionalities.
We start by creating an html file.
<!DOCTYPE html>
<html lang="en">
<head>
    <meta charset="UTF-8">
    <meta name="viewport" content="width=device-width, initial-scale=1.0">
    <link rel="stylesheet" href="https://use.fontawesome.com/releases/v5.15.2/css/all.css" integrity="sha384-vSIIfh2YWi9wW0r9iZe7RJPrKwp6bG+s9QZMoITbCckVJqGCCRhc+ccxNcdpHuYu" crossorigin="anonymous">
    <title>Drag And Drop</title>
    <link rel="stylesheet" href="./style.css">
    <script src="./main.js" defer></script>
</head>
<body>
    <section class="heading-icons">
        <i class="fas fa-house-user icons"  style="color:#ff6384" id="cat"></i>
        <i class="fas fa-car icons" style="color:#3ca2eb" id="dog"></i>
        <i class="fas fa-money-bill-wave icons" style="color: #4bc04b" id="dove"></i>
        <i class="fas fa-plane icons"  style="color:#9966ff" id="fish"></i>
        <i class="fas fa-mobile-alt icons" style="color:#ffce56" id="frog"></i>
    </section>

    <section class="droppable-elements">
        <div class="backlog" data-draggable-id="backlog">
            <h4>Backlog</h4>
            <div class="draggable" draggable="true" id="house"><i class="fas fa-house-user" style="color:#ff6384"></i></div>
             <div class="draggable" draggable="true" style="color:#3ca2eb" id="car"><i class="fas fa-car" style="color:#3ca2eb"></i></div>
            <div class="draggable" draggable="true"  id="money"><i style="color:#4bc0c0" class="fas fa-money-bill-wave"></i></div>
            <div class="draggable" draggable="true" id="plane"><i style="color:#9966ff" class="fas fa-plane"></i></div>
            <div class="draggable" draggable="true" id="phone"><i  style="color:#ffce56" class="fas fa-mobile-alt"></i></div>
        </div>

        <div class="droppable" data-draggable-id="todo">
            <h4>To Do</h4>
        </div>

        <div class="droppable" data-draggable-id="doing">
            <h4>Doing</h4>
        </div>

        <div class="droppable" data-draggable-id="done">
            <h4>Done</h4>
        </div>
    </section>
</body>
</html>
Also find the style code below:
@import url('https://fonts.googleapis.com/css?family=Montserrat');

* {
  margin: 0;
  padding: 0;
  box-sizing: border-box;
}

body {
  font-family: 'Montserrat', sans-serif;
  background-color: #eee;
  color: #111;
}

.heading-icons {
  display: flex;
  justify-content: center;
  margin: 2rem;
}

.icons {
  height: 5rem;
  display: flex;
  align-items: center;
  justify-content: center;
  font-size: 4rem;
  margin: 0rem 0.5rem;
  transition: opacity 0.2s;
}

div.draggable {
    height: 5rem;
    width: calc(100% - 20px);
    margin: 5px 10px;
    display: flex;
    align-items: center;
    justify-content: center;
    font-size: 2rem;
    background-color: #eee;
    border-radius: 4px;
    cursor: move;
    transition: opacity 0.2s;

    -webkit-box-shadow: 0px 1px 4px -1px rgba(33,4,33,1);
    -moz-box-shadow: 0px 1px 4px -1px rgba(33,4,33,1);
    box-shadow: 0px 1px 4px -1px rgba(33,4,33,1);
}

.draggable:hover {
  opacity: 1;
  background-color: #eae;
}

.droppable-elements{
    display: flex;
    justify-content: center;
}

.droppable,.backlog {
  height: 100vh;
  width: 60rem;
  margin: 1rem 10px;
  display: flex;
  align-items: center;
  flex-direction: column;
  text-align: center;
  font-size: 2rem;
  font-weight: bold;
  background-color: #fff;
  border-radius: 4px;
  transition: border-width 0.2s, transform 0.2s, background-color 0.4s;
  -webkit-box-shadow: 7px -5px 9px -10px rgba(0,0,0,0.75);
  -moz-box-shadow: 7px -5px 9px -10px rgba(0,0,0,0.75);
  box-shadow: 7px -5px 9px -10px rgba(0,0,0,0.75);
}

.droppable h4, .backlog h4{
    margin: 20px 20px;
    font-size: 1rem;
    text-transform: uppercase;
    font-weight: normal;
}

.droppable.droppable-hover {
  background-color: #d7f7db;
  border : dashed 4px green;
}

.droppable.dropped {
  border-style: solid;
  color: #fff;
}

.draggable.dragged {
  user-select: none;
  opacity: 0.1;
  cursor: default;
}

.draggable.dragged:hover {
  opacity: 0.1;
}
In the javascript file created, we go ahead and define variables for the draggable and droppable elements.
const draggableElements = document.querySelectorAll('.draggable');
const droppableElements = document.querySelectorAll('.droppable');

draggableElements.forEach(element =>{
    element.addEventListener('dragstart', dragStart);
})


droppableElements.forEach(element => {
    element.addEventListener('dragenter',dragEnter)
    element.addEventListener('dragover',dragOver)
    element.addEventListener('dragleave',dragLeave)
    element.addEventListener('drop',drop)
})
Each draggable and droppable element has to listen for drag and drop events as shown in the code above. So we might as well start defining the functions that handle the events. We start with defining a function called 'dragOver', to handle when an object is dragged over a different column(dragover event), say 'To Do' column. This is where we make an element droppable by preventing the default behavior of the element.
function dragOver(event){
    event.preventDefault()
}
When we drag an object over a column, we want the color of the drop area to change to green. and revert back when the dragged object leaves the area. So let us create functions to handle both. To achieve this, we add a class droppable-hover, which can be found in the style code.
function dragEnter(event){
    event.target.classList.add('droppable-hover')
}

function dragLeave(event){
    event.target.classList.remove('droppable-hover')
}
We now need to create a function, 'dragStart', that is called when the dragstart event is triggered. Each of the drag and drop event has a dataTransfer property that holds data associated with the element being dragged. The dataTransfer property has methods that can be used to store and retrieve this data. They are setData and getData respectively.
The dataTransfer property is very important in drag and drop operation. It can be used to keep track of object being dragged or dropped. After we begin dragging, we store the id of the dragged element into a variable with the setData method.
function dragStart(event){
    event.dataTransfer.setData('id', event.target.id)
}
Finally, we need to handle when the card is dropped in a column, so we implement a function called 'drop'. We can choose to do what we want in this function, but because of what we are trying to achieve, we would do the following:
- We retrieve the dragged element id with the getData method of dataTransfer property
- We use it to get the dragged element
- We fetch the droppable object by its id.
- We append the dragged element to the droppable object.
See the code below
function drop(event){
    event.preventDefault()
    event.target.classList.remove('droppable-hover');
    const draggedElementId = event.dataTransfer.getData('id');

    let child = document.getElementById(draggedElementId);

    let newParentDiv = document.getElementById(event.target.id)

    newParentDiv.appendChild(child)
}
In conclusion, drag and drop is an important feature in creating interaction between our apps and users. We can find drag and drop feature in many modern day applications. A key example, as pointed above is the kanban board which can be found in many project management applications.
Click here to see the fully built implementation. You can find the source code at (https://github.com/bankymono/drag-and-drop-walkthrough)
Cover Image Credit: Freepik.com